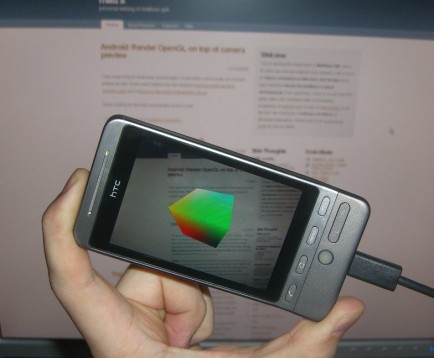
I was searching for that today and thought I could write a short wrap-up of what I ended up with. Particularly helpful was the Android TranslucentGLSurface sample code and a thread in the Android Beginners group.
Keep reading below for the fully commented source code.

Let’s start with the onCreate method of the main activity code.
public void onCreate( Bundle savedInstanceState ) {
	super.onCreate( savedInstanceState );
	// When working with the camera, it's useful to stick to one orientation.
	setRequestedOrientation( ActivityInfo.SCREEN_ORIENTATION_LANDSCAPE );
	// Next, we disable the application's title bar...
	requestWindowFeature( Window.FEATURE_NO_TITLE );
	// ...and the notification bar. That way, we can use the full screen.
	getWindow().setFlags( WindowManager.LayoutParams.FLAG_FULLSCREEN,
							WindowManager.LayoutParams.FLAG_FULLSCREEN );
	// Now let's create an OpenGL surface.
	glView = new GLSurfaceView( this );
	// To see the camera preview, the OpenGL surface has to be created translucently.
	// See link above.
	glView.setEGLConfigChooser( 8, 8, 8, 8, 16, 0 );
	glView.getHolder().setFormat( PixelFormat.TRANSLUCENT );
	// The renderer will be implemented in a separate class, GLView, which I'll show next.
	glView.setRenderer( new GLClearRenderer() );
	// Now set this as the main view.
	setContentView( glView );
	// Now also create a view which contains the camera preview...
	cameraView = new CameraView( this );
	// ...and add it, wrapping the full screen size.
	addContentView( cameraView, new LayoutParams( LayoutParams.WRAP_CONTENT, LayoutParams.WRAP_CONTENT ) );
}
When I was writing this, I was wondering why I had to set the GL view first and then add the preview because actually I want to have the preview below the GL surface, so this looks a bit strange to me. I didn’t find an answer on that one yet, but it works that way.
The rendering is implemented in a separate class GLClearRenderer which is pretty much like the one used in the GLSurfaceView introduction. It’s trivial since I’ve used it only for testing purposes. A real application would most likely subclass GLSurfaceView, too, in order overwrite onTouchEvent etc.
public class GLClearRenderer implements Renderer {
	public void onDrawFrame( GL10 gl ) {
		// This method is called per frame, as the name suggests.
		// For demonstration purposes, I simply clear the screen with a random translucent gray.
		float c = 1.0f / 256 * ( System.currentTimeMillis() % 256 );
		gl.glClearColor( c, c, c, 0.5f );
		gl.glClear( GL10.GL_COLOR_BUFFER_BIT );
	}
	public void onSurfaceChanged( GL10 gl, int width, int height ) {
		// This is called whenever the dimensions of the surface have changed.
		// We need to adapt this change for the GL viewport.
		gl.glViewport( 0, 0, width, height );
	}
	public void onSurfaceCreated( GL10 gl, EGLConfig config ) {
		// No need to do anything here.
	}
}
If you comment out adding the camera view in onCreate, you will already be able to run the application and see the flashing screen.
Now for the last part, the camera access. As you’ve seen that earlier, the whole logic is implemented in CameraView. Thanks to Androids easy-to-use camera API, rendering the preview into a surface is straightforward.
public class CameraView extends SurfaceView implements Callback {
	private Camera camera;
	public CameraView( Context context ) {
		super( context );
		// We're implementing the Callback interface and want to get notified
		// about certain surface events.
		getHolder().addCallback( this );
		// We're changing the surface to a PUSH surface, meaning we're receiving
		// all buffer data from another component - the camera, in this case.
		getHolder().setType( SurfaceHolder.SURFACE_TYPE_PUSH_BUFFERS );
	}
	public void surfaceCreated( SurfaceHolder holder ) {
		// Once the surface is created, simply open a handle to the camera hardware.
		camera = Camera.open();
	}
	public void surfaceChanged( SurfaceHolder holder, int format, int width, int height ) {
		// This method is called when the surface changes, e.g. when it's size is set.
		// We use the opportunity to initialize the camera preview display dimensions.
		Camera.Parameters p = camera.getParameters();
		p.setPreviewSize( width, height );
		camera.setParameters( p );
		// We also assign the preview display to this surface...
		try {
			camera.setPreviewDisplay( holder );
		} catch( IOException e ) {
			e.printStackTrace();
		}
		// ...and start previewing. From now on, the camera keeps pushing preview
		// images to the surface.
		camera.startPreview();
	}
	public void surfaceDestroyed( SurfaceHolder holder ) {
		// Once the surface gets destroyed, we stop the preview mode and release
		// the whole camera since we no longer need it.
		camera.stopPreview();
		camera.release();
		camera = null;
	}
}
7 Comments