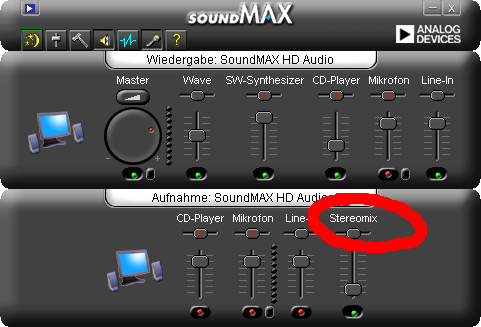
Since my posting on the SoundMAX BSOD issues has become quite popular, I have decided to write another posting on my more recent experiences with the drivers in Windows XP. The problem was that it did not crash anymore but it did not let me record my cards output (which is called “StereoMix” or also “What You Hear” as a recording device). Here’s how to fix it.
Disclaimer: I am writing this from memory as I did this some weeks ago. I cannot guarantee that this will work out, nor I can guarantee that this does no harm to your computer. I cannot be held responsible for any inconveniences, crashes or loss of data you may experience due to this instructions.
The last driver I used was V5.10.1.4560 but in the meantime a new version, namely V5.10.1.6240 dated 05/18/2007, became available for download at the ASUS ftp site. In the extracted archive, there’s a file which contains all the information required to install and setup the driver files and I found several entries which explicitly disabled the Stereo Mix for whatever reason. I changed all of them and installed the driver, and this is what I got:

Here’s a step by step guide to help you making the necessary changes.
Modify the installation package
- Download and the archive from here and extract it to an empty directory.
- Open the file W1254624J_XP32SMAXWDMW2K_XPADIHdAud.inf in a text editor, e.g. Notepad.
- Go to line 1322 (or search for “Disable Stereo Mixer”) and change the following line
HKR,AD1986\Disable, "OutR", 1, 01 ; Disable Stereo Mixer
to
HKR,AD1986\Disable, "OutR", 1, 00 ; Enable Stereo Mixer - Do the same at line 1355 (or continue searching for “Disable Stereo Mixer”)
- Save the edited file.
Install the driver
Installing is a bit more complicated. First of all, you will need administrator privileges in order to install the driver. Moreover, note that I’m using a German Windows XP installation and I don’t know the exact English versions of the labels. So take my translations with a grain of salt.
The easiest way would be to use the provided W1254624J_XP32setup.exe – you may want to try that first. Double click the file to start and follow the instructions on the screen.
But since I already had an earlier version of the package installed, I just wanted to update the drivers. I used the hardware control panel:
- Click on “Start” -> “System Settings” to open the System Settings dialog.
- Open the System window. If you have the categorized view enabled, click on “Performance and Administration” followed by the “System” symbol in the bottom right. If you have the classic view enabled, just click on “System”. The System dialog should pop up.
- In the System dialog, click on the “Hardware” tab and click on the “Device Manager” button. The Device Manager dialog should pop up.
- Open the tree item “Audio-, video- and game-controllers” and double click on the “SoundMAX Integrated Digital HD Audio” item. A properties of “SoundMAX…” dialog should pop up.
- Click on the “Driver” tab, then click on “Update…”. An Update-Wizard should pop up.
- In the wizard, chose “No, no this time” in order to prevent Windows from searching online. Click on continue.
- On the next wizard page, chose the second option, “Install software from list or specific location” or something like that. Click on continue.
- On the next wizard page, chose the second option again, “Don’t search…” and click continue.
- On the next wizard page, you should see a list which contains one item “SoundMAX Integrated Digital HD Audio”. Select this item, then click on the “Media…” button below the list. A “Installation from medium” dialog should appear.
- Click “Browse…” to browse for the installation file. A file dialog should pop up.
- Browse to the directory where you extracted the archive to and chose the W1254624J_XP32SMAXWDMW2K_XPADIHdAud.inf file there. Click “Open”.
- Now that the file is selected, click “Continue…” and follow the onscreen instructions. The new driver should get installed.
That should pretty much be it. Let me know if you have any questions or remarks.
27 Comments